
Contact Form 7’s Stripe integration module allows you to add a credit-card payment widget into your contact forms. You can start collecting money in simple steps. No additional fee is required to use this module.
You need a Stripe account to integrate. If you don’t have one yet, create an account first. Also, please notice that you need an HTTPS-enabled site to use this module.
Connecting to the API
This module uses Stripe Elements and Stripe.js, and it interacts with Stripe API to work. To start using it, obtain your API keys first.
- Log in to the Stripe dashboard.
- Go to Developers > API keys.
- Copy the publishable key and the secret key for the live mode.
Then, open another browser tab and follow the next steps:
- Log in to the WordPress dashboard.
- Go to Contact > Integration.
- Click Setup Integration in the Stripe panel.
- Paste the publishable key and the secret key into the input fields in the panel.
- Click Save Changes.
That’s all. If a connection between the API and your website has been successfully established, you’ll see blue lines around the borders of the Stripe panel.
Setting up your contact forms
After establishing connection to the API, the next step is to set up contact forms by adding a form-tag for the Stripe payment widget.
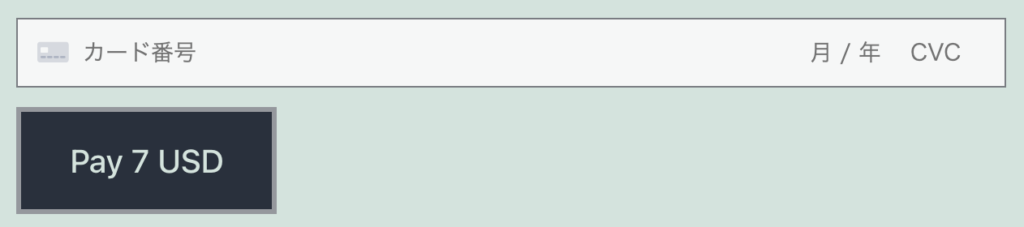
Contact Form 7 provides the [stripe] form-tag for a payment widget. The following is an example of the [stripe] form-tag:
[stripe currency:usd amount:700 "Proceed to checkout" "Pay 7 USD"]
A [stripe] form-tag is composed of two options and two values.
The currency option represents the currency of payment. The value must be a three-letter currency code that Stripe supports.
The amount option is the money amount of payment. Note that the amount must be provided in the currency’s smallest unit. For example, USD’s smallest unit is 1 cent (not 1 dollar), so currency:usd amount:700 in the above example will charge 7 US dollars (not 700 dollars).
Stripe has slightly complex rules for a chargeable amount for some currencies. You are strongly advised to consult Stripe’s documentation.
The following two values ("Proceed to checkout" and "Pay 7 USD" in the above example) are optional, and if you set them, they are used as the label texts of the submit button; the first one will be used in the initial submission stage, and the second will be used in the secondary stage, respectively.
Since a [stripe] form-tag includes a submit button, you don’t need another submit button in the same form. If you have [submit] form-tags in payment forms, you can safely remove them.
Once a payment is settled, an email of receipt will be sent to the buyer. By default, the ‘your-email’ field is used to obtain the buyer’s email address, so having the ‘your-email’ field in the form is recommended.
Another useful tip: add a special mail-tag [_stripe_payment_link] to the email template. This will be replaced by a URL link to the Stripe payment page where you can get detailed information about the payment.
Security considerations
Payment forms are a highly attractive target for scammers. Protect your forms with security modules that Contact Form 7 provides. At the very least, reCAPTCHA is a must for payment forms. Using Akismet together is also advisable.
Unfortunately, there remains the possibility that some scammers can sneak through the tight security measures. Stripe provides reliable solutions and manuals you can use when your payment forms get abused.